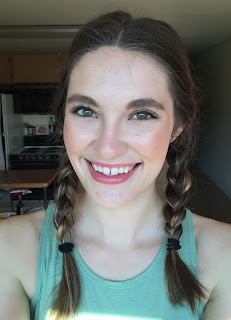
1. Start with a clean and moisturized face - You want to make sure that you have a moisturized base for your makeup to go on smoothly, and to keep your skin healthy and hydrated!
2. Prime your face - I prime every area of my face with different products to create a smooth base for my makeup, and so that everything lasts through my whole day. I use a face primer all over my skin, an eye serum for underneath my eyes, and an illuminating cream for my highlight areas (top of cheekbones, center of nose, cupid's bow) so that they pop once my foundation is layered on top.
Stila One Step Correct
MAC Strobe Cream
Clinique Pep-Start
3. Put on a thin layer of a natural and lightweight foundation - To keep the look natural, go for something that feels comfortable for you to wear all day long, and something that just blends in with your skin but gives your imperfections some coverage.
Laura Mercier Candleglow Soft Luminous Foundation 'Vanilla'
LOUD Makeup Flat Top Kabuki Brush
4. Correct and conceal - Place correctors (if needed) and concealer under your eyes to conceal dark circles, and over any blemishes or spots that you need extra coverage on.
YSL Touche Eclat Neutralizer 'Bisque'
NARS Radiant Creamy Concealer 'Vanilla'
Beautyblender
5. Set your makeup - To make sure your makeup is set for the entire day, you want to set it with a powder. Choose whatever works for you! I set different areas of my face with different products. First, I set my under-eyes by pressing a loose powder onto the area directly with my Beautyblender to prevent creasing and lock the concealer in. I let it sit for several minutes before brushing it away.
Laura Mercier Translucent Setting Powder
Beautyblender
Next, I use a luminous, finely milled powder to finish off my face. This keeps me looking natural, luminous, and feeling lightweight. I always reach for my Ethereal Light powder because it finishes off my makeup with a beautiful glow!
Hourglass Ambient Lighting Powder 'Ethereal Light'
LOUD Makeup Large Powder Brush
Lastly, to set my under-eye area once more and add some more brightness, I take a yellow-based powder and a tapered brush to dust off any translucent powder that may be left over. This will clean the area up a little bit while brightening as well. I always reach for Diffused Light because it keeps my under-eye area from looking powdery or cakey, and brightens.
Hourglass Ambient Lighting Powder 'Diffused Light'
LOUD Makeup Angled Contour/Blush Brush
6. Fill in the brows - Using whatever method works best for you, fill in and shape your brows. I like to lightly fill in my brows without doing any real shaping or defining, because my brows are a bushy forest!
Anastasia Beverly Hills Brow Definer 'Soft Brown'
7. Apply bronzer - This is my favorite step! I love using a matte bronzer to really warm up my face and give it some life. I put bronzer onto my temples, my hairline, and my cheekbones, think of the areas that the sun would naturally hit.
TheBodyShop Honey Bronzer '01'
LOUD Makeup Tapered Powder Brush
8. Apply blush - For this natural look, I love going for a nude shade that is just one-two shades darker than my natural skin tone. This just adds a little warmth and life to my face without making me look made up. I apply this to the apples of my cheeks and work leftover product back towards my cheekbones.
L'Oreal True Match Blendable Blush 'Bare Honey'
Bobbi Brown Blush Brush
9. Highlight - To add some luminosity and glow to the skin, I like to add a natural highlight on the high points of my face. I always reach for the Luminous Light powder because it is so natural and light. It is a tan powder with a bit of opalescent sheen to it, no shimmer or glitter, so it looks lit-from-within once applied.
Hourglass Ambient Lighting Powder 'Luminous Light'
LOUD Makeup Domed Highlight Brush
10. The last of it: eyes, brows, and lips - Applying a mascara can really amp up your look and make you look much more awake and alert. On days I do this look, I always reach for the Benefit Roller Lash because it keeps my lashes curled and makes me look wide-eyed and bushy-tailed! To make sure my brows stay tamed all day, I apply a tinted brow gel and brush them upwards (I do this after mascara because when I apply it first I always end up screwing it up with my mascara wand afterwards). For lips, I go for a sheer wash of natural color, the Lancome Shine Lover lipstick is my go-to because it offers hydration and a natural wash of healthy color.
Tweezerman Rose Gold Lash Curlers
Benefit Roller Lash
Benefit GimmeBrow 'Light/Medium'
Lancome Shine Lover '354'
11. Spritz your face - Applying a mist or setting spray is my favorite part of the natural makeup routine. I use MAC Fix+ because I love the sensation of it on my skin, and how it smells. I find that this extra step just makes my makeup look that much more natural. It diminishes any powdery remains on the skin and adds luminosity, and it's very cooling and refreshing when the sun comes out!
MAC Prep + Prime FIX+
12. Go out and wow everyone with your natural look!
I hope you guys enjoyed this easy natural look that has been my go-to lately! Hint hint: you'll probably see a few of these items in my upcoming April favorites! Teehee. I tend to change up my makeup routine every few weeks to every month, so I was debating on posting a "current go-to makeup routine" kind of post every month, is that something you guys would be interested in?
What's your go-to look lately and your favorite products to achieve it?


No comments:
Post a Comment