Saturday, January 31, 2015

Post-Workout Protein Smoothie

After all my baking this week, I decided I'm going to start a cleanse this coming Monday (there is NO way I'm starting a cleanse on Superbowl Sunday, that's snack day, GO HAWKS). But don't worry, I'll still have more recipes coming your way, I can never resist a cookie! I also plan on sharing my cleanse experience with you if you're interested.

I've been trying to get back at the gym, and my rule of thumb is to eat protein within 30 minutes of my workout. I've started taking protein powder, but I just can't find one that tastes good. I have some great chocolate protein powder, but mixed with water it is still a bit unsettling. So, I thought I'd try it in a smoothie to go down better, and it was to die for!

What you'll need:

Blender
1 banana*
A heaping 1/2 cup of vanilla yogurt, or one yogurt (I use Dannon Light & Fit)
1 tbsp natural peanut butter (I use Adam's 100% natural crunchy unsalted)
1 tsp honey
1/2 cup almond milk (I use vanilla flavored)
1 serving of chocolate protein powder (I use Cytosport 100% Whey, keep in mind you can always do 1 tbsp of unsweetened cocoa powder instead, it will still provide a ton of protein post-workout)

*This smoothie will work the best if you have a frozen banana! But it works just as well if you use a room temperature banana and add some ice cubes into your blender, that is what I do.

Directions:

Combine all your ingredients in the blender, blend to desired consistency. Enjoy!

P.S. This makes a huge serving! This recipe would be best for two unless you have a huge appetite, it makes about 24 oz., but I just have half after my workout and half an hour later.


Let me know what you think! Do you have any great protein meals you'd be willing to share? Next on my list is trying protein pancakes!

Thursday, January 29, 2015

Snickerdoodles

Right when I thought the sweet-tooth was over, the stress of getting midterms back set in, and now I'm back on the cookie kick.

Now, for my favorite cookie recipe. I've always loved snickerdoodles, but I've never found a recipe where the dough tasted almost as good (if not better) than the cookie, but this one is it! When I was looking for a perfect snickerdoodle recipe, I of course defaulted to my favorite sweet-tooth website, Averie Cooks, and I've been baking way too much since I found this website...

Here is the link to the original recipe: http://www.averiecooks.com/2014/09/the-best-snickerdoodles.html

Like I said in my last cookie post, there's a lot of information (it's great stuff) in the link, but if you just want a simple go-to for the recipe, I've re-written a shorter, simple version.

What you'll need:
For the cookies -
1 stick of unsalted butter, melted
1/2 cup granulated sugar
1/3 cup packed light brown sugar
1 large egg
1 tsp vanilla extract
1 1/2 cups all-purpose flour
1/2 tsp baking soda
1/4 tsp cream of tartar
1/4 tsp sea salt

For rolling -
1/4 cup granulated sugar
2 tsp cinnamon

Directions:

1. To a large bowl, add the butter and sugars and beat on medium-high until well-mixed.

2. Scrape down the sides of the bowl, then add egg and vanilla. Beat on medium-high until fluffy.

3. Scrape down the sides of the bowl, then add flour, baking soda, cream of tartar, and salt. Beat on low until mixed.

4. Place rolling ingredients (sugar and cinnamon) into a small bowl and mix, place this bowl off to the side for later.

5. Place aluminum foil on a baking sheet. Roll your dough into small balls and place on the cookie sheet, flattening them slightly. I like my cookies sort of small, so I ended up with about 20 cookies. Place this sheet in the fridge to chill for AT LEAST 1 hour.


6. Preheat your oven to 350 degrees. Line a baking sheet with parchment paper. Roll each ball of dough in your cinnamon and sugar mixture to your liking. Try and space your cookies about 2 inches apart, this allows for 8 cookies per baking sheet. 


7. Let bake for 8-9 minutes for a nice and gooey cookie, or a bit longer if your like your cookies crunchy, but keep in mind that they will harden as they cool. 

8. Enjoy! 


I usually end up having at least half of my cinnamon and sugar mixture leftover, so I like to keep it in an old spice jar so I can use it for the next time I make snickerdoodles (the next day probably, these are wicked good).  


I hope you are enjoying these awesome recipes! Let me know if you'd like to see more, or if you'd like to see less of them! Hopefully you love these as much as I do! xoxo

Wednesday, January 28, 2015

Natural Skin Mask

It seems as though the chocolate and the midterm sweet tooth has been getting to me, my skin is showing it.

I've been waiting to find a great skin mask for awhile now, and I've found a few, but I'm just not willing to spend $40+ on one. It is especially hard to find beauty products that are natural and toxin-free while being affordable. I decided to give something of my own a try after doing some research on home skin remedies!

What you'll need:
1 tsp cinnamon
1 tsp nutmeg
2 tbsp raw* honey

*Raw honey is what supplies the antioxidants for this mask; you can of course use regular honey, but it doesn't supply the same benefits, because they are cooked out in regular honey!


P.S. These are just guidelines! You can try different combinations of measurements and ingredients!

Directions:

1. Measure out spices, and mix together.

2. Pour in raw honey, mix well (this may take a few minutes of folding everything together). Your substance should look something like this:


3. Apply! You can wear it for whatever time you wish, but my suggestion would be twenty minutes or less.


I only used about half of my mixture and I tried to apply it as evenly as possible. Make sure you pull your hair back as tightly as you can, or you'll get honey everywhere (learn from my mistakes)! If you start to feel anything uncomfortable when you're wearing the mask, remove it immediately. I would suggest that you use this no more than once a week, skin irritation is really common if people exfoliate or wear masks too often. 

Don't be alarmed if your face is a light rosy pink or red after the mask is removed, mine did the same. My skin was really soft and noticeably cleaner the next day! I loved it!

The reason this mask works so well is because of the natural ingredients and what they do individually for skin care. Raw honey is an antibacterial, so it is great for acne treatment even on its own. It is also filled with antioxidants, thus great for anti-aging. Honey is also a natural moisturizer, so it won't leave your skin feeling dry and crusty like some masks do. It opens your pores, unclogging them and clearing your skin. Cinnamon brings oxygen to the skin, declogging your pores and it can also help reduce acne scars. It is still a bit of a mystery why nutmeg works as such a great natural skin care ingredient, but it is well known for increasing the health and appearance of skin. It reduces puffiness and irritation, reduces marks and acne scars, and hydrates your skin. Having these spices as a blend also creates a nice exfoliating feature.

I hope you guys give this a try! Let me know if you love it as much as I did! Do you have any natural beauty remedies or ideas for me? Please contact me or comment below and share! xoxo

Tuesday, January 27, 2015

Edible Cookie Dough (Egg-Free)

Can you guys tell I have a sweet tooth? Disclaimer: it is midterm week, I'll eat anything with chocolate or sugar you put in front of me.

One of my favorite traditions of the week is sitting down with my boyfriend every Monday night to eat out of a tub of cookie dough while we indulge in our biggest guilty pleasure: The Bachelor. (Don't tell him I told you). I'm also a food freak, so the raw egg in dough has always wigged me out a little, and cookie dough tubs get expensive!

This week I came across a recipe for egg-free cookie dough and thought I'd give it a try. Verdict: YUM. It takes a total of about two minutes to make and is delicious! I like it best refrigerated, but Jason can't wait, so he eats it right when I'm done making it. It's considered a serving of two...but I don't agree with that, so maybe prepare to double your batch!

What you'll need:
1/4 cup packed light brown sugar
1/8 tsp vanilla extract
1/8 tsp sea salt
1 tbsp milk
2 tbsp chocolate chips (or 3, 4, you know, whatever...)
5 tbsp flour
2 tbsp melted unsalted butter

Directions:

1. Mix butter, sugar, salt, and vanilla in a small bowl.


2. Mix in the milk.

3. Mix in flour one tablespoon at a time until you reach desired consistency.


4. Add in chocolate chips (or anything else sweet, like m&ms!)


5. Try and keep it for yourself, good luck!

Credit recipe to: http://www.familyfreshmeals.com/2014/04/edible-cookie-dough-recipe-two.html

Let me know what you guys think! Any fun and simple sweet tooth cures for me? I'd love to hear! xoxo

Sunday, January 25, 2015

Oatmeal Chocolate Chip Cookies

For the past week, my boyfriend has been begging me to make oatmeal cookies. Midterms are just around the corner, so his sweet tooth has been growing (not saying mine hasn't too)! I went to my favorite website, my default for all goodies, and found this awesome recipe for oatmeal chocolate chip cookies that I loved so much that I wanted to share it with you guys!

Here is the link: http://www.averiecooks.com/2014/11/the-best-oatmeal-chocolate-chip-cookies.html

The link to the recipe is kind of a lot to read through, and a lot of amazing cookie photos that will make you jealous (my cookies don't look nearly as good), so if you want a short and simple version, here is mine...

What you'll need:
1 large egg
1 stick of butter, melted
1/2 cup packed light brown sugar
1/4 cup granulated sugar
1 tbsp vanilla extract
1 1/2 cups old fashioned oats
3/4 cups flour
1 tsp cinnamon
Pinch of sea salt
1 loaded cup of semi-sweet chocolate chips
Optional: 1/2 cup of raisins or nuts (I opted out on this portion)

Directions:

1. In a large bowl, add your egg, butter, sugars, vanilla, and beat on medium-high until all your ingredients are creamy and mixed.

2. Scrape the sides of your bowl with a spatula. Now add the oats, flour, cinnamon, baking soda, salt, and beat on low until everything is mixed.

3. Scrape the sides of your bowl with a spatula. Add your chocolate chips, and raisins/nuts if you're adding those. Beat on low until mixed.

4. Grab a baking sheet and line it with aluminum foil. Now roll your dough into the cookie size you wish, flattening the dough slightly. Once you've placed all your cookies on this sheet, pop it in the fridge and chill your dough for AT LEAST two hours, this makes for way better cookies, I promise it is worth the wait!


5. Preheat your oven to 350 degrees. Line a baking sheet with parchment paper (you can spray your pan with cooking spray instead, but I think they turn out better with parchment paper). Place your cookies on the sheet about 2 inches apart (I put 8 cookies per sheet) and bake for 11 minutes (bake longer if you like your cookies crunchy or well-done).

6. Enjoy! (If you don't live alone I suggest you create a small secret cookie compartment for your own sake)


I will admit, the dough was so good that only about half of my refrigerated dough ended up making it into the oven...

Do you guys have any sweet treat recipes you'd be willing to share with me? I'd love to add some new recipes to my book! xoxo

Saturday, January 24, 2015

Simmering Spices

My favorite thing about fall has always been the scent of apple cinnamon. The fresh smell of a pine christmas tree, the fragrance of peppermint teas and mochas, any smell you can think of that reminds you of fall, it makes me giddy. I love winter, but I'm really missing the scents of the autumn season. Starbucks is running out of pumpkin spice, Trader Joe's has sold out of their peppermint Joe-Joe's and Pumpkin Pancake Mix, so I thought I'd do something to bring fall back to my house. I am so excited to share this one!

What you'll need:
1 large navel orange
1 large apple (peeled, any kind you want)
1-2 cinnamon sticks
Cloves (ground or whole)
Water
A 32 ounce mason jar (optional)
A large pot

Directions:

1. Gather your ingredients


This is my helper cat, Fitz, who was very distraught that I was paying attention to something besides him. He kept rolling my orange on the floor and hiding my teaspoon measure from me, just because he's a huge punk.

2. Cut up your fruit and measure about 1/2 tsp of ground cloves. Cut your orange into thin slices. Cut all the skin off of your apple, you will be using all of this. Cut only 3-4 slices of the apple to use.


3. If you're using your mason jar, you'll need to cut your apples and oranges into fourths so they can fit well in the jar. Pour in all your ingredients (try and layer presentably if you're giving this as a gift). If you are gifting or saving this, it should save for at least a week in the fridge.


4. Fill your 32 ounce mason jar with water, all the way up to the mouth of the jar.


5. Pour in a pot, and simmer all day long! 


I can't rave about this enough! After about twenty minutes, my house smelled delicious. And the best part about this is that these ingredients are usually laying around! Give it a try and let me know if you guys love it as much as I did. I'd love to hear if you have any fun and simple household tips or DIYs for me! xoxo

Thursday, January 22, 2015

DIY Distressed Pants

With winter season just starting, I've been gravitating toward darker wardrobe colors, dramatic makeup, and edgier style. I found an old pair of pants in my drawer, and I finally decided to do something with them. I've always loved the style of distressed denim, but I have a hard time spending $50 on a pair of pants with a million holes in them! So, I decided to distress my dirt cheap H&M jeggings.

What you'll need:
1. A pair of pants
2. A box cutter or knife (scissors work too)
3. A razor (optional)
4. A wooden block, or a hard surface small enough you can slip into your jean leg.


Step 1: Put your pants on, and mark with a visible pencil at the areas you wish to distress (you'll be thankful that you didn't just start cutting in random places pants-off). I chose to distress mostly around the knees, because it looks most natural. I marked where I wanted the distress to begin and end on each knee.


Step 2: Take the pants off, and place a hard surface in the leg of your pant, under the area you plan on cutting. I chose to use a hardback book.


Step 3: Begin cutting where you've marked on your pants. Start with your marked areas and work inward. Cut your strips about a half inch apart, any thinner may unravel your pants, and thicker might not give the look you're trying to go for.


Step 4: For the rest, take the knife to larger sections, and the razor to smaller areas such as the pockets and the cuff of the jeans. I chose to cut a few small slits on the upper thigh and lower calf of each of my legs, as well as take the razor to the hem on the back pockets, front pockets, and the bottom of my pants.


Step 5: When you're happy with the way they look, throw them in the washer and dryer. Wash, dry, wash, dry, and you're done! Easy peasy.

Step 6: Pair with an outfit of your choice for an edgy look!

I chose to go with a dark purple lip color (Rebel by MAC), and I double-winged by liquid eyeliner for an even edgier look!

I paired my distressed skinnies with some H&M ankle booties, a graphic shirt, and a floppy felt hat.


Let me know what you guys think! Do you have any cool wardrobe tips or DIYs you'd like to share? I'd love to hear them! xoxo

Monday, January 19, 2015

Chicken Pot Pie Turnovers

     Lately I've been trying to take up some new hobbies to destress from school, and my favorite way of doing this has been trying lots of new recipes to see if I can build up my recipe binder. Just the other night I tried a recipe from Pinterest that I've been wanting to try for months and I had to share because it turned out incredible!

     I don't know about you guys...but I have a freaky obsession with pot pie. And, if you by chance live in Bellingham, you are missing out if you haven't tried ManPies downtown, their pot pies are the best I've ever had. Anyways, I'm getting off track.

     I thought a recipe for pot pie would be expensive and difficult, but these cost me $10 or under to make and the only tedious part was the crust. Totally worth the hassle too!


     Here is how mine turned out....


     They're a great winter comfort food! My only suggestion would be to buy two boxes of pie crust...the recipe says it makes 10 turnovers and I could only roll out enough pie crust for 7. Then again, I'm cheap and didn't want to go buy a rolling pin so I made due with a beer bottle (maybe that was the issue...). The plus about having only 7 turnovers was that I had a bunch of extra filling, so I used it for soup leftovers, yum!

     If you guys try these, let me see how yours turn out! Or, do you have any great recipes you can share with me? I'd love to add some more to my book :)

Saturday, January 17, 2015

Review of January Julep

     Hey guys! I'm here to rave about another awesome monthly box I've fallen in love with! In November I became a Julep Maven, and I'm totally loving it!

     Julep is a monthly box that is $24.99 a month, but they always have great deals to try out your first box! Here's the newest posting if you guys want to give it a try!


     The reason I love this box is...well there's lots of reasons! To start, they have awesome products! Their polish is long-lasting and it doesn't have that strong "polishy" smell to it, because they don't use the icky, toxic ingredients that most nail polishes contain. They also have some great perks! If you're running a tight budget on your month, or you feel like you're just not into it, you can "opt out" any month you want and you won't receive a box or be charged. 

     One of my favorite things about Julep is that when you start your subscription, you build a beauty profile with all your details so they can learn about you, and when you do this, you also choose a style profile, which tells Julep what you want to receive in your box. The best part: you can change this every month if you want! I am "Classic With a Twist" (it isn't in the photo below), which means I get two nail polishes, and a full-size beauty product every month. Here are your options (+ Classic With a Twist):


     Some other really cool things are the "My Monthly Box" and the "Secret Store" tabs you can see on the left in the photo above. The "My Monthly Box" opens up on the 20th of the month, when it reveals what you'll be getting in your box. If you don't want a spoiler alert, don't look! But if you do decide to take a look, if there's a nail color or a product you don't like, you can click "Swap" and swap it out for any of the products it lists as options! I absolutely love this about Julep, I did this last month for the first time so that I loved everything I got. The "Secret Store" opens up on the 1st of the month, and has some deals on Julep products for a limited time. Stuff is usually half off or even cheaper! 

     Now for the reveal! I went to "My Monthly Box" on the 20th and changed my products so that I could receive a nail color I wanted, a clear top coat (I needed it desperately), and a really pretty lip color! Here's what my adorable Julep box looked like...


     After the inspirational quote, the new collection flyer, and the coupon code they sent me, here's what I got!


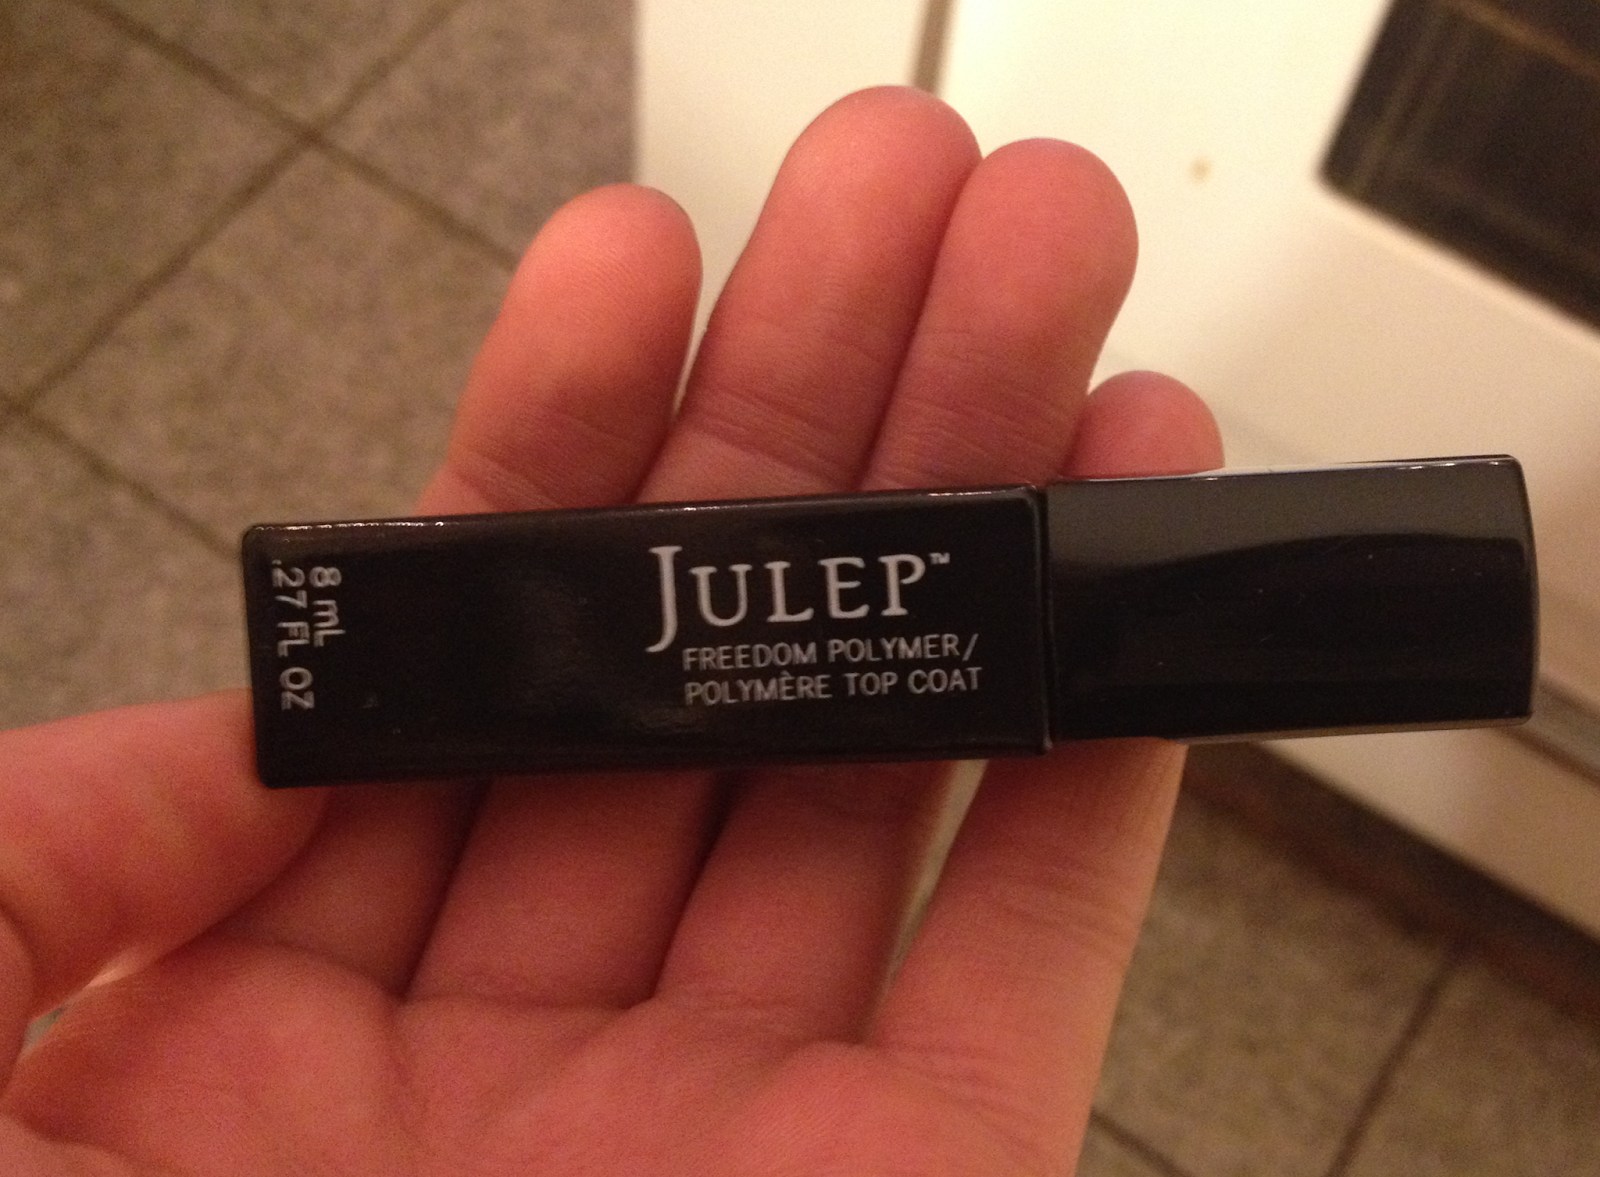
     For a little closer look, I got the Freedom Polymer Top Coat, which I love! It doesn't have the strong smell like most top coats do, and it stays on for a lot longer than any that I've tried.


     The other polish I got was the "Phyllis", it's a pretty, very light and subtle pink, and it's exactly what I wanted!


     The full-size beauty product I picked out was the Plush Pout Lip Crayon in "Cardinal Red". I can't even tell you guys how much I love this stuff! Some lipsticks and lip crayons are so frustrating because they dry your lips out so much, but this is really is a game-changer. The color is a bright, vibrant red and its moisturizing for my lips. Usually, when I find a lip crayon or color I like that doesn't dry my lips out, it usually doesn't last long at all, but this stuff stayed on for my full work shift and I talk to customers all day long! Thumbs up, Julep, for creating such an awesome lip crayon! By the way, I'm wearing the Phyllis nail polish in this photo :)


     Julep was extra cool this month, and they sent me two surprises in my box! I got a little box of Junior Mints as a sweet treat, and another top coat. The top coat I got is the "Metamorphic Top Coat", and it's so cool! It totally transforms your nail color! This is a limited edition coat, so you can't buy it on their website currently :(


     Do you want to become a Julep Maven? If so, here's a link to start your box: http://www.julep.com/offer/box/lipstick

     Julep also does some great work with women support, and they're really inspiring! If you're a Julep Maven or want to be, tell me what you love about them, or how your experience is! I would love to connect and talk to each and every one of you <3

Wednesday, January 14, 2015

Review of January Birchbox

     Hey everyone! In November I kept hearing all this Black-Friday hubbub about Birchbox, so I thought I'd look into it. I've done monthly subscriptions before, and it usually just ends up being dangerous as hell and not so great (in my experiences). Birchbox has totally changed my mind...

     For those of you who haven't heard of it, Birchbox is a monthly beauty box subscription. You build an account with your "beauty profile", filling out your hair and skin type, skin shade, as well as what you'd like to receive in your boxes. It is $10/month (a total steal!), and you get five samples! The past two months I've gotten six and seven samples just because Birchbox is the best!
   
     They always have great deals going on to get extra samples if you are ordering products, and you can get points for reviewing the items you've received, which turns into actual account money after 10 reviews ($10)! The samples aren't huge, but they're usually really long lasting (I've been using my mascara sample every day for two months and its still thriving)! All the items that come in your box are personalized for you based on your beauty profile. You get an email when your box ships and you can look up your tracking number at any time. You can do month-by-month or a yearly subscription to save a few bucks. It's a little surprise every month! And if you follow them on Instagram, they'll give you sneak peeks into what could be in your box at the beginning of every month.

     So, if I convinced you to give it a try after my rant on Birchbox's awesomeness, here's the link to get your subscription started: https://www.birchbox.com/?utm_source=google&utm_medium=cpc&utm_term=birchbox&utm_campaign=brand%2520-%2520desktop%2520-%2520core&gclid=CjwKEAiAxNilBRD88r2azcqB2zsSJABy2B96zMLhLHdZJN2OmFNyiAx63AwAlJY1TfDrmwEGTvw8NhoCLiTw_wcB
   
     I recommend ordering your subscription BEFORE the 25th of the month, otherwise your subscriptions will come at kind of weird times for the next two months before Birchbox gets it all straightened out.

     If not, let me show you a peek into what I got this January! I just got it yesterday, and I already tried everything out so I could share it with you guys! This month, the theme for Birchbox is "Let's Do This!" for the New Year. They've posted a 31-day challenge on their website with tons of potential freebies if you enter yourself and ways to challenge your health, fitness, and well-being to start 2015 off right.


     Once you open your box, they always have a cute little notecard with a message on the front, and a list of your products on the back. The list tells you everything about your products and how much a full-sized version would be if you decide to purchase it!


     The first thing I pulled out was Oi Beautifying Potion. Also not listed on my sheet were two extra samples of Oi shampoo and conditioner. I tried the shampoo and conditioner the shower last night and am absolutely IN LOVE with how soft and smooth my hair was afterwards. Now...the smell is what I'm not too sure about! It's a very natural smelling product, but almost a little manly...I don't dislike it, but I'm not too keen on it. I made my boyfriend sniff my hair (the poor guy), and he wasn't feeling it either. But honestly, with how lovely it made my hair, I could care less about the smell!

https://www.birchbox.com/shop/davines-oil-absolute-beautifying-potion


     The next thing I got was Dr. Jart+ Beauty Balm. One word: YES. This stuff (which I just put on this morning as a primer) is awesome! It made my skin look brighter and rejuvenated, and I felt so moisturized! This will definitely be in my shopping cart.


     The next thing I pulled out of my box was a fragrance called "Sincerely" by Harvey Prince. I'll be honest with you guys...really not a fan. I like the idea behind the smell, a sweet Indian spice blend with clove, but it ended up being far too perfumey. If you like strong and sweet, then this is definitely the perfume for you. But for me, it ended up in the trash can.


     And now...my favorite thing this month: NAOBAY Body Radiance Lotion - AKA - the best lotion I've ever used. I put it on my legs post-shower last night and loved it! The smell is to die for. It's not super strong but has the perfect citrus, almost lemony, hint to it. The lotion itself moisturizes wonderfully, a little goes a long way! It made my legs so smooth, totally in love with this stuff.


     And, for the grand finale, I got theBalm "Stainiac". I really like the idea of this, it is a creamy balm to stain your lips or cheeks. The color was a little light for my personal taste and complexion, but it felt really nice on my lips and I am excited to give it a try on my cheeks! 


     Do you get Birchbox or any other awesome subscriptions? I always love finding out about new subscriptions or products, and I'd love to see what you guys got this month! Please email me or comment! Share your stuff!